Monday, September 21, 2015

Squidventures

My giant squid, Flower, is probably one of my favorite projects I've ever made. Although there certainly isn't any practical reason for having one, it was one of those things that I saw and just knew I had to make!


I made Flower in February and March of 2014, knitting a lot of it during class (it was a favorite topic of discussion in my Indigenous Literature and Film class) and finishing it on a road trip to Portland, Oregon that my fiance and I took over spring break. I've been meaning to make another squid for awhile, and bought the yarn for it several months ago. I just got around to it this past week, knowing I would have lots of knitting time as my fiance and I took a week off to drive up to the north shore of Lake Superior for some camping.


We ended up cutting the trip a bit short (but still taking the whole week off) because we were both feeling anxious to get back to our place and work on getting things moved and organized. This is when I happened to discover a little issue with my first squid.

During my move, I packed Flower into a garbage bag along with some other knitted animals (like a Big Snowy Owl that still needs eyes and a beak) and when I finally got around to opening the bag, I noticed a familiar unpleasant smell.

Cat pee.

As it turns out, my cat peed on Flower's poor, unsuspecting squid head at some point - I kept the squid on top on my bookshelf which my kitty Alaska liked to hang on and around. She isn't usually one for peeing on things, so I'm still a bit confused as to why, but that's cats for you.


She's too cute and fluffy for me to stay mad at.
I was pretty disheartened about the stink and grossness resulting from the cat pee, and figured I would have to try it out and re-knit the left fin and re-knit/re-stuff the top of the head if it didn't come out. Thankfully, my new place has a super fancy HE washing machine that doesn't have the middle bar (like the machine at my old place), which I think would have made it really difficult to machine wash her otherwise.

This afternoon, I apprehensively put her in the washing machine on the most gentle wash and spin cycle settings, keeping my fingers crossed that my poor squid baby wouldn't come out mangled.


She survived the wash, getting a bit misshapen in the process but otherwise looking (and smelling!) so fresh (and so clean, clean) and I decided the dryer might be a good idea as well, especially considering that it has a delicate cycle and extra low heat option.


Now that she's clean and mostly dry, I set her up to dry on top of my mannequin because it was the perfect size to fit her underside on so she can dry nicely. It also has the added advantage of making her look like Octodad.


I've made some pretty serious progress with Squid #2 the past week, with all eight arms finally done.


Which is good, because I think I might have lost my mind if I had to knit one more of those damn bobbles. I made the underside last night, and am now dreading all of the seaming on the arms, because seaming is more or less my arch knitting nemesis. I think in the end my motivation to finish Squid #2 (think of all of the squid cuddling possibilities!) will let me power through the rest of the pattern... wish me luck!

Tuesday, September 15, 2015

New Yarn Storage and Organization

Recently I moved out of the house I had been in for my entire four years of college and in the past month I have been busy moving into my new place. It's a basement apartment with lots of space and a huge spare room that I instantly knew would make a great office and craft studio space.

When I first started to envision how my craft studio would look, I of course thought about how and where I would store my yarn. I had my ikea cube shelf in mind, as I had used it for yarn,as well as books and other things, in my room at my past house:

The shelf hiding behind my loft bed

Sadly, the base of my beloved shelf (literally) fell to pieces; it had suffered sump-pump failure a few times at my college house and although it seemed to be holding together fine after, once I took it apart to move it, the damage was apparent. I had thought I could fix it, but once I saw the inside was covered with black mold, it was obvious it was beyond repair.

Since the rest of the shelf is in good shape, I still wanted to find a way to use it again. My mom asked my uncle if he could build a replacement base, and he was able to. I was very pleased I wouldn't have to get a totally new shelf!

Putting it back together was more labor-intensive than I had imagined, as the new base isn't as thick as the old one and my mom and I needed to drill deeper holes into the other boards to get the wooden dowel pegs in deep enough to fit in the shallower base.


Now that it's together, I've gotten nearly all of my yarn onto in and fairly well organized as well. I was surprised at the amount of space left over, but I think the open shelves will be great for fabric storage and maybe scrapbook storage as well.

I primarily organized my yarn by fiber type, with all the acrylic yarns together (and sorted by warm, cool, and neutral colors) and my wool, cotton, and alpaca yarns all together. I also used a shelf for all my bare yarn to be dyed for my etsy store, and a shelf for all of my New Zealand yarns as well.

I'm looking forward to having a more organized stash and getting more of my crafting supplies organized on the shelf!

Thursday, May 7, 2015

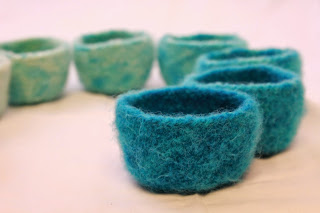
Pattern - Ombre Felted Trinket Bowls in Two Sizes


These cute little felted bowls are decorative and functional - use them to store odds and ends, stack them up, or put them on a coffee table to brighten it up. This is a great use for hand dyed ombre yarn, but of course any yarn could be used - I'm sure a set of these in bright rainbow colors would look awesome!


Materials :
  • approximately 100 grams of worsted weight wool yarn - ombre or multiple colors (each small bowl uses about 15 grams of yarn and each small bowl uses around 23 grams)
  • US size 10.5 double pointed needles or circular needles for magic loop (or size to obtain gauge) 
  • Stitch markers 
  • Tapestry needle to weave in ends
  • Top loading washer OR bucket/plunger for felting

Gauge (before felting) :

Approximately 3 sts per inch in stockinette - gauge isn't overly important in this pattern but your gauge should be very loose so the bowls can felt effectively.

Sizes : 

Small bowls measure 3.5 inches in diameter after felting.
Large bowls measure 5 inches in diameter after felting.
Note - finished size will depend on extent of felting and gauge.

Techniques necessary :
  • Casting on and knit stitch
  • Knitting in the round
  • k2tog (knit two together) or similar decrease
  • Felting - KnitPicks has great tutorials for hand felting as well as top-loading machine felting!

Pattern :
Small bowls :


Starting at top rim of bowl, cast on 40 stitches on DPNs or circular needle for magic loop, using long-tail or other preferred cast on method. Place marker for beginning of round and join, being careful not to twist.

Rounds 1-15: Knit around
Round 16: [Knit 6, k2tog] around
Round 17: Knit around
Round 18: [Knit 5, k2tog] around
Round 19: [Knit 4, k2tog] around
Round 20: [Knit 3, k2tog] around
Round 21: [Knit 2, k2tog] around
Round 22: [Knit 1, k2tog] around
Cut yarn, leaving a 6-9 inch tail. Thread tail through remaining stitches and pull tightly to close bottom of the bowl.


For ombre bowls, continue to make bowls from same skien of yarn. I was able to make 8 small bowls with about 100 grams of yarn.

Large bowls :


Starting at top rim of bowl, cast on 54 stitches on DPNs or circular needle for magic loop, using long-tail or other preferred cast on method. Place marker for beginning of round and join, being careful not to twist.

Rounds 1-20: Knit around
Round 21: [Knit 7, k2tog] around
Round 22: Knit around
Round 23: [Knit 6, k2tog] around
Round 24: [Knit 5, k2tog] around
Round 25: [Knit 4, k2tog] around
Round 26: [Knit 3, k2tog] around
Round 27: [Knit 2, k2tog] around
Round 28: [Knit 1, k2tog] around
Cut yarn, leaving a 6-9 inch tail. Thread tail through remaining stitches and pull tightly to close bottom of the bowl.


For ombre bowls, continue to make bowls from same skien of yarn. I was able to make 3 bowls with about 75 grams of yarn.


For both sizes:
After you have knit your desired number of bowls to create a set, weave in ends making sure to leave at least an inch after trimming the ends. Then either felt the bowls by hand or using a top-loading washing machine. The bowls should be fully felted with very little to no stitch definition at the end of the felting process; this will help the bowls hold their shape best. While they are still damp, shape the bowls, making sure they are all the same size and shape. 
Let dry and then use them for storage or decoration (or a gift!)


Please contact me with any questions you may have or any errors you catch in the pattern!